Women’s Peaked Hat Challenge
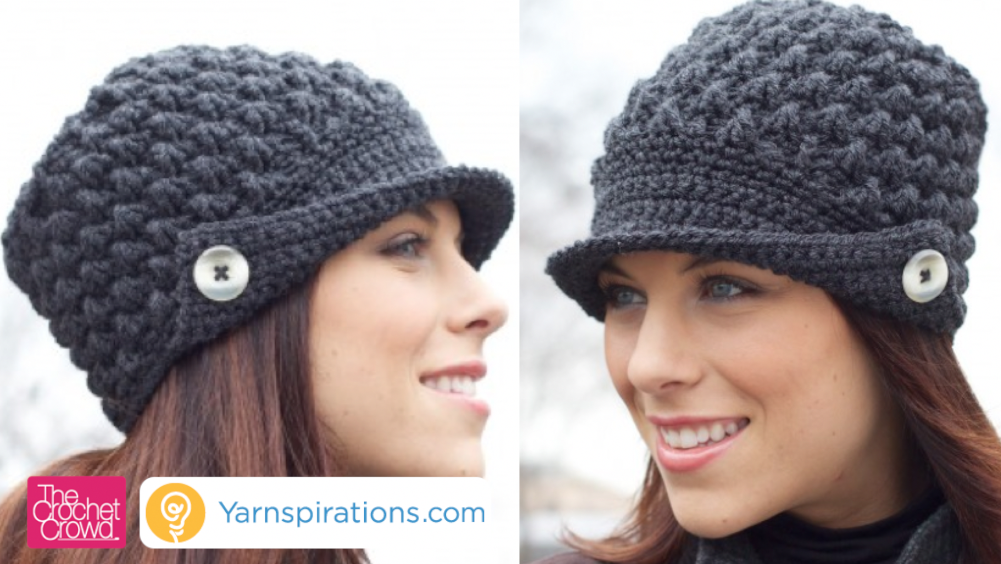
Women’s Peaked Hat
This Challenge is Now Over. Thanks to all who submitted their hats. We received 4,409 entries for this challenge.
Challenge is from January 1 – 31, 2015. Ending at 11:00 pm on January 31, 2015, Eastern Standard Time.
The challenge will help beat the cold winter. It will also make for a great project to make for gift giving and charity causes.
Challenge Goals
- Learn a New Stitch Technique
- Learn How to Create a Visor
- Use Buttons to Embellish Your Work
- Create Opportunities for Gift Giving and Charitable Donations of the Finished Hat
One lucky winner will be selected to receive a Yarnspirations Gift Pack, value $100 + Crochet Crowd Gifts.
Materials List
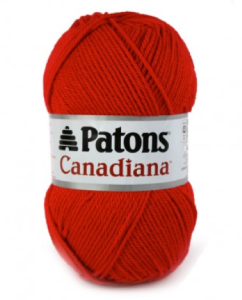
- 2 Skeins (if wanting a solid colour project) OR 5 Skeins of Different Colours (if you want to play with colour for a unique looking project) of Patons Canadiana Yarn, 3.5 oz / 100 g: 205 yds / 187 m. Learn more About This Yarn and/or order online.
- Size H/8 or 5.0 mm Crochet Hook
- 2 – 1″ fancy buttons to go with the colour you decide. You can change the size of the buttons if you cannot find 2 – 1″ buttons that you like. The finished project must have buttons to qualify.
- Needle and thread to fasten buttons to project.
For this challenge, you are given 3 options to be able to follow the pattern. This will allow everyone to be successful. This is a intermediate level project.
- Written Instructions
- Crochet Diagram
- Video Tutorial
Increasing the Size – NOT IN PATTERN
Some crocheters are experiencing a sizing issue. If your hat is appearing too small by the time you finish round 8. I am going to give you two additional rounds to follow to increase the diameter of the hat by 2″.
My advice will put 4 DC’s between each spoke instead of just 3. It will make a significant difference.
ROUND 9 – Ch 2, *1 dcfp around next dcfp. 1 DC into the next 3 dc, 1 dcfp, 2 dc into next dc and then 1 dc into the next 2. Repeat from * AROUND
Round 10 – Ch 2, *1 dcfp around next dcfp. 2 DC into the next dc, 1 dc into the next 2 dc, 1 dcfp, 1 dc into next 4 dc. Repeat from * AROUND
Once you get this done…resume the pattern as normal starting at Round 9 as per the pattern.
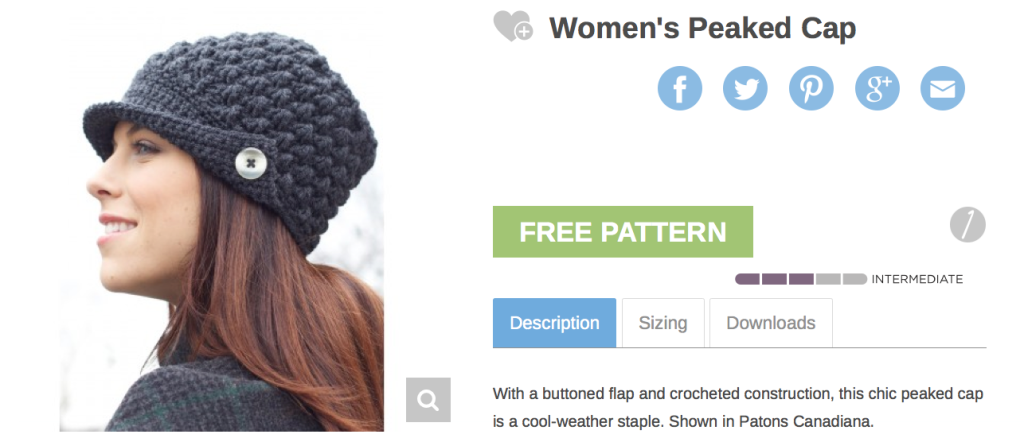
Free Pattern
Video Tutorials
General Guidelines
- Each completed project you do is an entry. You are welcome to submit as many completed projects as you like. If your projects are all the same colour/design, you must take a group photo to prove there is a multiple as each hat qualifies as an entry.
- Suggested Yarn is Patons Canadiana; however, you may substitute your yarn to make this project. Review the Patons Canadian information on Yarnspirations.com to determine substitution if required.
- You can choose any colours you wish and you can mix and match your yarns. Project can be done in solid or mixed colours.
- The pattern must be followed completely which also includes the buttons on the side of the hats. Extra embellishments can be added to the project after the main project is completed.
- You can change the button sizes if you prefer. Keep in mind the finished project needs to have buttons to qualify for the entry.
- There is no advance sign up required.
- The challenge is open to all fans of The Crochet Crowd. There are no restrictions of country of origin associated this challenge.
- The draw at the end is random to be fair to all challengers.
Standard Guidelines
- There is no sign up required to participate. Complete the project and submit your photo when you are done. This challenge is open to fans of The Crochet Crowd. There are no restrictions of country origin associated to our challenges.
- You may use any yarn you wish. You may substitute your yarn for any brand or colors that you desire. You may create any color scheme
- You may do as many projects as you wish. Each submitted project is considered a separate entry. If multiple entries are identical, a picture showing the projects together to prove their are multiple must be included with your submissions.
- We require your photo to show the entire project so we know the entire project is done. The project photo must be showing all of the project for us to examine it’s completion. Ensure your project is completely finished with yarn tails and etc not showing. It’s like giving it out as a gift, we want to the see the photo showing as if you were gifting us the finished product. We will then know you are completely done.
This is intended for a fun community challenge only. We each are deserving of the highest praise possible for our own creativity. Let’s have fun.
How To Submit Your Photo
Submitting for the Crochet Crowd Challenge is really easy.
Please email your photo to:
MikeysHelpDesk@hotmail.com
- Please use Subject Title: Hat
- You must include your name and full mailing address to qualify.
- Attach your photo(s).
If you have forgotten to include your name and address in your email and have to resend, you must send in your photo again with your new email.
Give us a 3 day window to review and enter your photo into our challenge. Do not resubmit. We do not acknowledge the arrivals of each email, but you may check our assigned gallery for this draw to ensure we have received it. The galleries are in alphabetical order by the name you gave us.
To avoid your email from being misdirected and hitting our junk box. You must use the subject title. We are not responsible for emails that are misdirected as a result of a submission not following this procedure. To protect our servers, we delete any emails that arrive that have no subject title to prevent malware and virus programs from our systems.
View The Submissions Gallery Sent In By Challengers
- Photo will be checked to verify it meets the challenge requirements.
- All photos must be submitted during the challenge time frame only to be eligible for the prize giveaways. Entries after this due date will be accepted for our gallery but there are no prize giveaways after the deadline. We are firm on deadlines and do not offer extensions to be fair to everyone who has submitted on time.
- When you email your finished photo to us, we respect your privacy and will only post your first and last name on the picture in our gallery with the photo so we can identify the winner at the end.
- Posting your photos to our Facebook Wall doesn’t count as an entry. You must send it to us in the form above for us to review.
- We may feature the submitted photos in our social media such as Facebook, newsletters and/or website.
- We will not switch the photo if you are unhappy with how it looks in the gallery, please ensure it’s the photo you definitely want featured is the only one sent.
- Your emails are kept on file for the duration of the challenge and then deleted afterwards. We do not add your email to our newsletter lists.
- Due to the countless technology platforms and services, we are not responsible for any of our challengers if a mobile devices or technology that isn’t compliant to being able to read our website, view our videos and/or get access to the free patterns.
- Please verify your entry is in our gallery prior to our draw. We need up to 3 days to get your entry into our gallery. We upload it ourselves as part of our review process. If you do not see your entry, we most likely haven’t received your email. Do not wait until after the draw to check if your entry is in.
- We are not responsible for any emails that are not delivered to us before the due date.
Show’n Tell on Facebook
- Show’n Tell: Post your finished project on The Crochet Crowd Facebook Page to show everyone your finished work so we can drool over your creativity.
- Featuring on Facebook is dependent on you. We do not upload your emailed photos to Facebook. You have to do that yourself if you want to Show N Tell your creativity.

Pingback: A Little Something for the New Year | Frogging Along
Love the Hat Mickey, tried to follow the written pattern but found it easier to follow your video. Loved it so much I have ordered myself some more yarn with some Christmas money I had going to try a two colour version.
Ok. So I tried the increase to 4 instead of three but now I am confused on what to do in the row after the single crochets. What goes in between the set of three fpdc and the next set?? Two dc??
Depending on how full you want your hat, you will add a DC to the extra center stitch or a CH1 on the top side. Be sure to be consistent with the location of either the extra DC or Ch st. You will have the look of a slight spiral on your pattern. Very nice!
Pingback: Crochet Crowd Challenge, accepted and completed | Sparkle & Doom Designs
Its a Lovely hat! I finished one already and will start another shortly. These competitions are a wonderful way to actually challenge and improve crochet skills. This is my first crochet challenge, and hence i would like to know where to find the participants Gallery?
Thank you in advance,
C. Hedwig
On Crochet crowd home page, top bar hover over PICS. Choose all Galleries. Find the gallery page for the hats and click on it. Long way around is go the challenges, find hat challenge, click on that, scroll down to where he says you can find the pictures ‘here’.
Im doing the Women’s Peaked Hat Challenge, get up to row 8 fine but then do the suggested increase. What i would like to know is once you have done the increase does that mean when you start the pattern again do you do 1 or 2 stitches in between the 3 fpdc, because if it’s just one stitch where do you place it & what about the gap that is there? I hope The Crochet Crowd can help as I’ve noticed a few people comment on this & this may also effect how you proceed from row 12. Cheers Nicole Potter
You could just add a ch 1 , either before or after the fan, but make sure you do it the same side every time. If that is too open for you, then add a second DC, but be consistent with which one you use for the fan on the next row.
How do I join the challenge????
Mikey thanks so much for all the video tutorials and that they are available in a left hand version. They have made learning a lot easier since I’m a visual learner. Keep up the great job and looking forward to many more!!
Great hat Mikey, just one question, when you do the two extra rows for the larger size, where do you work the stitches for the body of the hat?
Round 4 is killing me! I’m not sure what I am doing wrong in that round but it doesnt look right. Maybe its the yarn I am using I am not sure… Is there a written diagram of that round that I can see somewhere? This is my first crochet challenge and I really want to finish this. Even got some cute cheetah buttons for it tonight! Please help.
As I am working on this project, I am finding that the gap between the last fpdc and the first fpdc is larger than the gaps between the fpdc throughout the rest of the project. This is because of the CH2 at the beginning of each round. I was curious if it is meant to have such a larger gap, or if there is something I am doing wrong?
Please help!! I did my first hat as per the pattern and it fit a child, now I want to do a larger one, I have followed the pattern and added in the 2 extra rows, I am now on row 10 and it makes no sense as there are now 4dc between the “spokes” instead of 3, I have 80 sts rather than the 64 in the pattern….how do I continue??
Don’t panic! You have on extra stitch to cope with on the first side pattern row, Pick either one of the center 2 stitches as the ‘center’ one. Use this one every time! Then ad a chain st to sub for the extra stitch. Without the extra ch 1, you would be back at the original size again. Ch 1 after each DC on each fan pattern row.
So, I made this yesterday, following the video, looks super cute on my 10 year old daughter but is way too small for me. So tonight I’m making it again, with a size I hook, and possibly doing the increase rows as suggested way up above!! I love this hat, and I have had like 6 people on my FB ask me to make them one! LOL!!!
Are we able to sell our finished products?
Thank you.
Look up the original pattern, it will say. But usually there are no limitations, except not to sell their pattern or use the pictures they provided. It is always nice to add a note about who created it and their web site if any. People like to know, and it is nice to the creator of the pattern.
Sorry, I have another question. Can we add length to the actual hat (staying in pattern of course) before adding the band and brim? Even with the diameter increased the length is still too short.
Of course you can add as much length as you like. On all Mikey’s challenges, you can always do MORE than the pattern calls for, just not LESS. That because it wouldn’t be fair to others that make say a full sized throw and someone enters with a baby blanket size or baby sized hat. More is fine!
Can we substitute the beg ch 3, join with as to first check made, then ch 3 and 7 DC into the ring, with instead a check 4 at the beg and do 7 DC into first ch made and join to top of ch3 to eliminate the hole?
Auto correct sucks, supposed to be ch, not check, and ss, not as.
Everyone has their own way to start. Your method is just as good, and I use the magic circle. Maby Mikey has to show how acording to the pattern, because I know he prefers the magic circle himself.
Help! Unable to download pattern/graph on my phone so using tutorial only. When I finish row 5 I have a ruffle so I know I am doing too many stitches. But I cant figure out where Im going wrong because I dont know how many stitches should be in each row. I cant figure this out, please help.
Amanda, Think of the center as the base with radials coming out, row 2 has 2 st for every base radial, row 3 has 3 row 4 has 4 row 5 has 5 and so on. When doing this kind of pattern, the row # times the base # = the # of stitches. Base 12, row 5 has 60, base 8, row 6 has 48. This will help you in every hat, or in the round pattern you do.
Hope that helped.
Pingback: Challenges for 2015 | Gobetween Flames
Just wanted to say thank you Mickey. I am so proud to have found you. With you I have relearned how to crochet again. I appreciate you and appreciate the time you are taking to teach us new patterns. I love it. God bless you.
I’m going to be starting this challenge tomorrow and I just wanted to clear something up before that. In the written guidelines it doesn’t mention hook size but in the video you mention to make sure the yarn size and hook match what the pattern yarn is. I always use an I hook (I always do too much tension with an H) so I just wanted make to make sure that’s okay? : )
Yes… if you have too much tension… increase your hook size… 😀 It’s the safe way to go.
Hook size may be an issue with fit, but instead of your additional 2 rounds to increase size, if you increase the initial number of spokes from 16 to 18, you will achieve the same effect of increasing the hat diameter. You will end up with 72 single crochets in row 9 instead of 64. If 18 spokes make your hat too large you could go the uneven number of 17 spokes with 68 single crochet.
After trying your suggestion of increasing the hat size with the increased 2 rounds, I found that increasing the spoke numbers provides a much better fit.
Hope that’s not too confusing!
Thank you for the info regarding adding two extra spokes. The second hat I’m working on (with different yarn than the first) is working up too small. I tried the extra rounds suggested but it seemed too big and I got confused about where to place the lone dc between the 3fpdc on rnd 10 when I went back to the original pattern. Going to start over and try the extra dc on rnd 1. Thanks again!
I have a question. You say the pattern must be followed exactly, but you posted some ‘cheating’ techniques to increase the size. Can we follow the new instructions and still be eligible to enter?
Absolutely… if your hat is too small to wear… you won’t be able to wear it. Use the cheating technique to adjust the size… We are good with that!
Grr can’t get pAttern
Well I tried this…im a seasoned crocheter and something is not right here. I have tried this over 4 times and it looks nothing like this pic… did someone on your team follow ths directions and avtually make this?…
I did two of them to ensure the pattern is okay.
I followed the video and had zero problems making it!!
Any change in crochet can cause a different look. You are a different crocheter than Mikey, you might use a different yarn, a different hook size or even style, be left handed, or crochet tighter or looser than Mikey. All of these things make a difference. If you followed the pattern and like the outcome, then you did it right!
Mine was the same until I watched the video . I realized on rows 12 and 14 I made the mistake of doing a dcfp around the dcfp below instead of around the DC standing alone. I hope I said this correct.
It is easier for me to think of the original 8 stitches as the spokes of 8 sections. Each section will grow by one DC each row. (example…2 in second, 5 in fifth, 8 in eighth) just like you do in a hat without posts. Each section has 1 extra post and the increase in each row goes on either side of this extra post in turn. All the even rows will have an even number of DCs between ALL posts and the odd rows will have an odd number of DCs between one set of the posts in each section. More confusing for you? Sorry about that, but it allows me to double check that the rows are growing properly.
cant seem to get the video to work i get a knda merge which is you sttarting to talk about what the pattern is then it cuts to everything be ok music. then it ends.
also checked the blacket with the toy ( green , purple blue) and get same thing.
the side bar on the crowd challenge site has both as january challenge , so confused as what challege is for jan
last theres an add about a women finding a age treatment so she looks 30
not 60 . wonder if she crochet as much as the crowd members do , is that her secret ?
happy new year xx sian
The January challenge is the hat, http://crochetchallenges.com/next-challenge-january-2015/
Hope that helps. It’s at the top of the page.